Got Goat Milk? Make Cheese!

Remember the old saying "when life gives you lemons make lemonade"? Well when you have a herd of dairy goats it gets kicked up a notch to "when goats give you milk make cheese". Especially when you have a herd of hard working girls that have been line bred for years to put a minimum of a gallon a day in the bucket.
I have been making cheese for about 27 years. I have made both soft such as chevre and whole milk ricotta which is made from using whole milk and heating to a high heat then adding apple cider vinegar to cause coagulation resulting in curds that are separated from the whey and put in a mold or container for use in everything from lasagna to cheesecake. I have also dappled in hard cheese's including cheddar, jack and a few others.
But in the end I continue to produce three basic types. The chevre which can be used plain or with herbs. The whole milk ricotta and mozzarella.
But in the end I continue to produce three basic types. The chevre which can be used plain or with herbs. The whole milk ricotta and mozzarella.
My first introduction to cheese making came through purchasing my ingredient products such as rennet, cultures, cheese press, cheese cloth and so on from New England Cheese Making http://www.cheesemaking.com/ and I still purchase most of my needed ingredients and supplies from Ricki Carroll and the crew there.
I was hooked on this and a long standing love affair with stainless steel . What could be better then fresh cheese and butter plus other dairy products for one's family? So take a photo journey with me and let's make Goat Milk Mozzarella!


The recipe I am using is from "Home Cheese Making" published earlier under "Cheese Making Made Easy". The earlier book is not as large in content as the second . They are both from Ricki Carroll and I still have the early edition.
1 packet direct set thermophilic starter or 5 ounces prepared thermophilic starter.
1/2 -1 teaspoon lipase powder dissolved in 1/4 cup cool water(amount dependent on taste)
4 teaspoons citric acid dissolved in 1/4 cup cool water
Please note: The stage of lactation effects the curd stretch in step 7. Therefore you may find the need to use less in earlier lactation and more in later lactation.
1 teaspoon liquid rennet( or 1/2 rennet tablet) diluted in 1/4 cup cool, unchlorinated water
Cheese salt for salting to taste
Step 1 : I use a 5 gallon stainless steel pot with a glass lid. To which I add the raw fresh goat milk. I DO NOT pasteurize my milk. Our family has used raw milk for 31 years now and no one has ever had an illness caused by raw milk consumption. Please educate yourself about this issue and then make a choice for you and your families . Two gallons of milk is then heated to 86 degrees and the culture is added to sit for 2 min in the milk with an addition of lipase powder to enhance flavor then thoroughly mixed.Cover and let ripen for 45 minutes.
Step 2 : Toward the end of the ripening in another container place the remaining 2 gallons which has remained refrigerated and mix with the appropriate amount of citric acid. The cheese made on Sunday had 3.5 teaspoons of citric acid added to the 1/4 cup of cool water as it is late lactation milk. Lactation in goats is usually 10 months therefore can be divided into thirds. Early lactation is from freshening date ( the day of giving birth) to 3 - 4 months mid lactation is from 3-4 months until 6-7 months and the remaining months until drying off (ceasing to give milk) at 10 months.
Step 3: Add the chilled milk to the warm milk and gently bring the temperature back to 86 degrees.
Step 4: Add the diluted rennet to the milk and stir gently with an up and down motion for 1 minute. Let set for 15 minutes, or until the curd gives a clean break. Which is if one inserted a clean finger into the curd at a 45 degree angle and you have a clean and clearly division around the finger and curds you have a clean break.
Step 5: Cut the curd into 1/2 inch cubes and allow to set for 5 minutes. The cutting should be vertical , horizontal and on an angle from top to bottom of pot. When cutting the curd look for when cutting the curds the edges that they are sharp and retain their shape.
Step 6: Drain the curds in a colander for 15 minutes.

Cut them again into 1 inch cubes.

Step 7: Warm 1 gallon of water to 145 degrees. Place a handful (3-5)of curds into water to soak until their internal temperature reaches 130 degrees.


Step 8: Using your hands, stretch the handful of curds with upward motions until it is smooth and shiny. Work quickly if the curds become difficult to stretch dip it again in the hot water until it is flexible and stretching can continue. You will note as you stretch the cheese will take on a brilliant shine and stretch further. You can add your salt to taste as you stretch.

When your curds have been stretched to your satisfaction you can shape them in a ball and put into a bowl of ice water until firm.

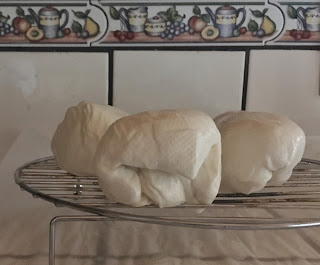
Finished product
 I highly recommend using the heavy kitchen gloves for the stretching. Saves your pinkies from 145 degree heat. I also individually wrap the balls and put them in a freezer bag and store up to 6 months while retaining the moisture and stretch of a fresh ball. In addition I have found this recipe easy to halve while retaining the positive traits of a whole recipe.
Keep in mind that as overwhelming this may seem at first time and practice are great teachers. The first time I made cheese was the same as my first time out with canning. Both the ingredients and myself were all over the kitchen and as I slowly cleaned up I found myself wondering "is this worth it"? Now these many years later I can judge a stretch by touch and shine . I can tell a water temperature by touch and just how long to hold those curds to get them going again without the thermometer for internal temperature. Just as my large animal veterinarian Dr. D said when questioned about how long after you graduate does it take to become good at what you do? Answer: "Why do you think they call it practice?"
Three of my favorite go to books:


posted by Goatldi @ 2:48 PM
5 Comments
![]()


5 Comments:
Nice tutorial Terry! Wish I had copious amounts of milk to make motz! YUM! I can make a mean pizza dough tho...Debbie
Now my mouth is watering, LOL. I just used the last of my goat mozzarella last week, and all the girls are dry! Kids hopefully in about 3 months.
I know that feeling. Nice to have less work but not so nice to have no cheese or soap. That is why I freeze my mozzarella as I have found it keeps it's integrity pretty well over a long period if done correctly. I too am going to breed for staggered kiddings. It is nice to have year round milk even if it means milking all year ;-)
Thanks Debbie! I think I can see my way clear to getting some Mozzarella to you for your "naked" pizza's. :-0
I freeze my mozzarella too. Just didn't get enough in the freezer this year because I sold my best milker before I got it all done. Store bought mozz just isn't the same.
Post a Comment
Thanks for leaving a comment on my blog. Hope to see you again soon!
Subscribe to Post Comments [Atom]
<< Home